
People store all kinds of things on the roofs – kayaks, skis, luggage, off-road recovery equipment, spare water and fuel, and in my case solar panels. Because we are maxing out on solar, we needed a simple, low-key roof rack to hold three panels. I also wanted to be able to attach smaller items such as off-road lights, a shower curtain, an awning, or antennas.
The Transit has premade threaded holes on the roof where aftermarket racks can be installed. The mounting points are covered by a rubber plug, and then painted over. Here is a diagram from Impact3d.com showing the positioning of these mounting points:

I wanted a roof system that allowed for maximum flexibility, low visual impact, gave a finished look, and was relatively easy to install.
I looked into these options:
Weatherguard (https://www.weatherguard.com/en/view/2102-0-01) commercial rails and brackets. This is the least expensive way to get rails on your roof. But I wanted more attachment flexibility for various kinds of things such as awnings, solar panels, etc. than the Weatherguard rails provided.
Custom-made rack. Upfitters and local rack companies will make a rack to your specifications out of aluminum or steel. Fairly expensive, but if you’re looking to mount a complex combination of items solar panels and kayaks, or looking to be able to walk on your roof you’ll need to take this approach.
My initial thought was I only wanted solar on the roof, and there are number of ways to glue solar directly to the roof without bothering with a rack system. While some have concerns with using VRB for an exterior application like this, amsolar.com has done a many of these installations over the years and never had issues with a bracket coming loose.
Impact3d.com roof brackets, with 8020.net aluminum roof rails.
I ended up going with this last option. Simple to install, and offered the maximum flexibility for solar, antennas, awnings, or whatever else I wanted to hang off the roof.
Although the van is over 19 feet long, it's surprising how little flat space is available on the roof. With the fan in front, there's a total of about 75 to 78 inches available for solar behind.
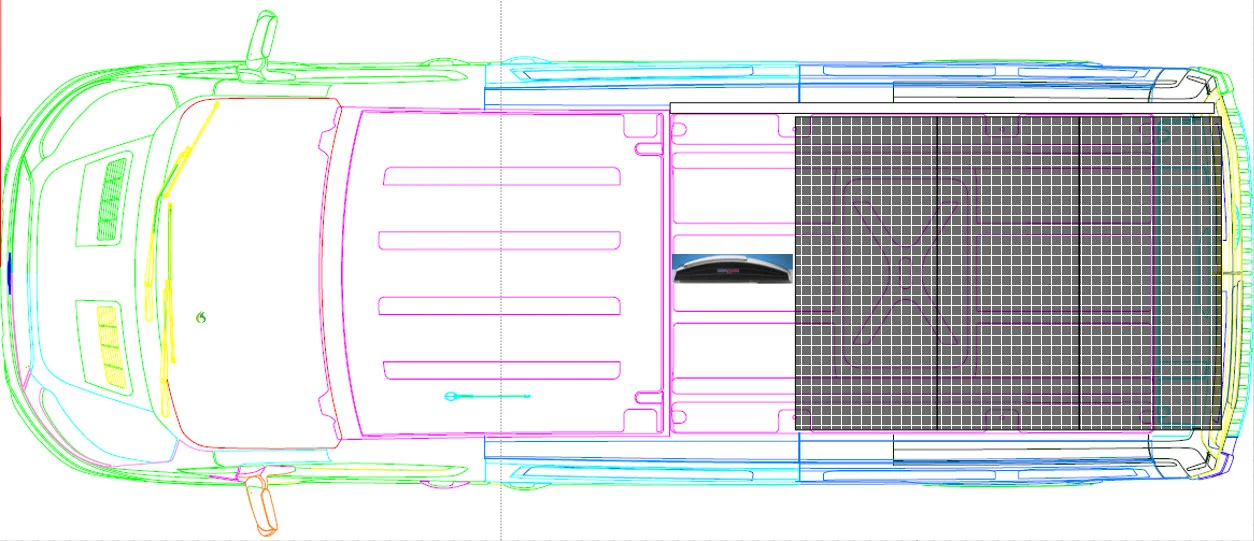
Three solar panels and MaxxAir fan on roof
Installation process
I basically followed Hein’s instructions. I did buy 102” 8020 1503 series rails from 8020.net, to maximize the rail length and allow me to attach an awning as far forward as possible.
Tips for installing VHB rail pads and brackets
for mounting 8020 15 series LS rails to roof of Transit van.
1) WARNING! Vans are tall! Be careful working up on a ladder. Don't get up on the top steps. Get a taller ladder! Have
somebody hold it.
2) Gently pry out roof plugs. Use small screw driver or trim removal tool. Protect the paint if you think you might scratch it.
Once plug is out, check to see that threads are accesible and enlarge hole if needed.
3) Clean area where pad will be located with isopropyl alcohol and degloss with scotchbrite pad. Do not abrade or scratch
paint with sand paper. VHB just needs a warm, dry and clean deglossed surface. Do not stick down pads yet.
4) Install 8020 sliders into rail (not provided) and attach all angles with hardware provided. Leave bolts just loose enough
so angles can be slid in 8020. If further attachments are to be made to inside of rail then add sliders for those now. Or drop
in sliders can be used.
5) IMPORTANT: To locate pads on roof, install all pads, brackets and rail BEFORE removing VHB backing from pads. For
bolts going into van: lubricate threads with anti-seize if bolts are hard to turn or start to squeak while tightening. They can
become stuck (cross threaded) if not careful starting them. Suggest starting with fingers and then using T handle hex key.
6) With rail loosely installed, align pads so inside of bracket corners are near edge but not overhanging. Do this for each
position and gently tighten bolts into roof. Mark perimeter of each pad with pencil.
7) Remove bolts into roof and set rail aside. Peel backing off of pads and stick them to roof. Tip is to align one edge and
then pivot on that edge until pad lightly touches. You can still pop it off at this point so make sure all pads are correctly
placed. Re-verify position and then press down the pads.
8) Apply sealant around counter sunk hole on bottom of angle bracket. Also a little dab in the countersink side to seal bolt
head. There is no need to seal the edges of the VHB in this application. Order of materials and parts is:
Bolt head - sealant - bracket - sealant - pad - VHB - van roof skin - M8 thread inside
9) Install rail and firmly tighten bolts into van. Repeat on other side. Check all hardware after 100 miles and twice annually
thereafter.
If you have questions please call or message Hein 541 490 5098