
Van Requirements
I’m a pretty analytical thinker – I’ve been in the software engineering field for the last 30 years – so the first thing I did was write a BRD (business requirements document). This helps keep me focused on what’s important. Here is a summary of our requirements:
Small and agile enough to get to trailheads on poor roads
Relatively invisible in urban environments or remote places subject to theft. Avoid vehicles that look like they have a lot of valuable stuff in them.
Self-contained, with no need to use RV parks for power or waste disposal.
Capable of supporting higher electrical loads. Sharon is planning to work three days per week, mostly doing videoconferencing with clients.
A great kitchen for quality meal preparation, including a large refrigerator, ample prep space, a two or three burner stove, and an oven for roasting and baking.
Multiple table spaces for work, food prep, crafting
Storage for year-round living including clothing, food, tools, two-person inflatable kayak, one or two mountain bikes, backpacking gear, office supplies and financial documents, big tent and carpet for outdoor living room
Toilet and shower. We are not interested in exiting the vehicle in a howling rainstorm at 3 AM to use the bathroom. And yes, 3 AM bathroom trips are common at our age :)
Capable of entertaining another couple for dinner with seating for four
Sleeping space for two, and passenger space for four (our two kids will occasionally travel with us)
Space for yoga and stretching
We like to live in an attractive and functional environment. We want the interior space to feel:
Light and well lit
Connected to the outdoors
Organic, exposing a lot of wood surface
Clean and uncluttered
Quiet and comfortable
Functional and efficient when cooking without bumping into each other
Buy or build?
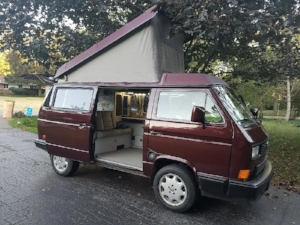
Nice 1990 Volkswagen Westfalia
When we looked around for what was available in the conversion van and Class B market, there’s really nothing like the Volkswagen Westfalia - a compact yet full-featured van at a reasonable price. In fact, 40-year-old Westfalias are selling for $40k and up!

Sportsmobile/Quigley 4wd Ford Transit
There are number of conversion companies doing conversions of Sprinters, Transits, and Promasters, and there are some great deals on used campers and Class B RV’s. But they are all longer, with less ground clearance, less storage, and less efficient use of space than we would like.
We looked at going with a smaller, more customizable conversion company. These companies do outstanding work and can build anything you want. But that customized approach comes at a price, ranging from $50,000-$150,000, not including purchase cost for the base vehicle. So we would be looking at $90,000 and up.
I have a variety of construction skills, and since I am currently a bit underemployed, I had the time to spare to put some sweat equity into building my own. So we made the decision to build.
Building is a significant time investment. Since we are doing what is essentially a class B motorhome from bare metal, I expect to spend over 1000 hours on the build over the next year.
Why a Ford Transit?
We did extensive research on the Mercedes Sprinter, Dodge Promaster, and Ford Transit. Aesthetically I prefer the Sprinter - for a massive moving box, it actually has decent lines. But we would like to travel in Central America, and it is difficult to find high quality diesel and a qualified Mercedes-Benz mechanic in remote places.
Ford, on the other hand, built their Transit using the same drivetrain that is in their pickups. There are over 650 Ford dealers in North America, all of whom have the skills to work on this vehicle for a reasonable price.
Design process
Designing a full-featured motorhome is a lot like designing an entire house and all of its systems, but in a very small environment with very expensive parts, curved walls and ceiling, and unforgiving metal to work with. I followed these steps in my design process:
Make a detailed drawing of the layout
Research materials, parts, and process
Do a detailed write up of the process for each component. This step was really important, because as I did the detailed write up, I learned about all the dependencies. For example, mounting a water tank under the van requires drilling holes in the floor, which affects the floor design and installation timeline.
Go back to step #1 and iterate.
There were so many decisions to make that I got decision fatigue and had to stop multiple times. I also kept questioning whether this level of detailed design was necessary, but there were enough blog posts about people who didn’t think things through all the way before beginning, and I continued to discover enough mistakes in my own design, that it seemed like a worthwhile investment to measure 10 times and cut once.
I ordered a new van from the dealer, and had to wait 3 months for it to be built. I didn’t want to delay our departure date by 3 months, so I started the design process without the van in hand, which added some difficulties and design churn.
Not that it was all pain – doing a design like this is really fun for me. I’m a designer and engineer by trade, and designing a space I get to live in is a real treat.
Before taking delivery of the van I estimate I spent about 300-500 hours in research and design.
Deliverables
At the end of the process I had:
A Microsoft OneNote book with 20-30 pages of notes on material selection, installation process, things to watch out for.
A Visio diagram of my floorplan, both from above and the left and right sides.
An electrical diagram listing all of the components, wires, switches, breakers and locations of each item.
An Excel spreadsheet listing most of the required parts, costs, sizes, and weight.
Creating a layout in Visio
NOTE: Everything in the van is curved. The distance between the walls starts out at 69” wide at the base, and shrinks to 61” wide at the top. The distance from floor to roof is 79” in the middle, but tapers to 76” at the sides. Both walls and ceiling curve inwards as you approach the front of the vehicle. Modeling these curves is difficult, so I mainly focused on the shortest dimensions in each direction.
I used Visio to create drawings of the van layout, both from the side and top. The hardest part of the layout design process was obtaining an accurate drawing of the inside of the van.
Sportsmobile publishes a simple top view floor plan guide. This was accurate to scale (3” per gridline), but lacked detail, and was top view only. They also have an online design studio which is pretty clunky to use, but who am I to complain since they were giving it to me for free.
Ford produces a CAD drawing, but I don’t have a CAD program, nor do I want to learn one for this project.
FarOutRide published a PDF version of the CAD drawing. I was able to import pieces of this PDF as images into Visio, and since some of the major dimensions’ scale was listed in the CAD image, I could then calculate the remainder by matching the image scale to the Visio document scale.
I also went to a couple of Ford dealers and did my own measurements, recording myself on my phone with a tape measure. That was really useful, since I often didn’t know in advance what measurements I would need.
I then drew a diagram of the van from the top and side, locating the floor dimensions, wheel wells, ribs/support structure on the walls and ceilings, sliding door, window openings, etc.
Planning Resources
Forums
https://www.fordtransitusaforum.com/. This site and its members have given me 90% of the information, inspiration, and support I needed for the design process. For nearly every problem I was trying to solve, there were multiple threads describing various solutions to that very same problem. It did take a lot of time and a lot of endless reading for no immediate return on investment. I never knew when a random post would disclose information that was important to me. For example, last night I learned that screwing a stainless steel nut onto a stainless steel bolt in an exterior environment is not a good idea. The nut and bolt will seize up, and you’ll have to grind them off. The solution is to use anti-seize compound. This would have affected my solar panel installs about a year down the road, when I no longer had a house or shop to effect repairs.
https://sprinter-source.com/forum/. I started on this project thinking I would be building on a Sprinter chassis, and still get a lot of valuable conversion information from these folks.
Conversion blogs
https://faroutride.com/ford-transit-camper-van/. These Canadian folks post a lot of resources for others to use, including the essential CAD drawings in PDF form.
https://bearfoottheory.com/category/van-life/. Nice high quality build by Outside Vans, but a lot of money.
http://www.ortontransit.info/. Dave Orton is a frequent contributor on the transit and sprinter forums, and has a lot of common sense engineering approaches.
http://anniebuild.blogspot.com/. Stan is another frequent contributor on the transit forum, does great woodworking and design and has a nice blog.
Conversion upfitters
https://sportsmobile.com/transit-van-info/. Lots of layout, components, construction ideas and techniques. Also a nice comparison between the three van platforms.
https://www.vanspecialties.com/. Another premium outfitter with lots of ideas in their galleries. I visited their facility in Portland and experienced an extreme case of Van Envy, ogling all of the $150k 4x4 Mercedes Sprinters (and one Transit) in various stages of completion.
YouTube channels
https://www.youtube.com/user/cargovanconversion. Great set of videos, great editing, love the laid back music, and lots of technical tips and tricks to learn from.
https://www.youtube.com/user/asimba2/videos. Although he owns a sprinter rather than a transit, this guy does meticulous work and talks extensively in his videos about his choices.